
Easter Crafts for Kids - Egg Shell Art
Who else is egg-cited for Easter?
If like me, you're looking for ways to keep your little bunnies entertained over the Easter holidays that don’t involve copious amounts of chocolate, then you’ll want to get cracking with one of my all-time favourite Easter crafts to do with the kids.
The tradition of decorating eggs dates right back to the Ancient Egyptians, who used to wrap their precious ostrich eggs in colourful dye before boiling them and gifting them away. Fast forward to today, and the tradition of giving decorated eggs at Easter time remains strong. We love this easy Easter craft for its simplicity, immense breakfast table fun, and with only a handful of cupboard ingredients needed, you won't find yourself 'shelling out' on lots of fancy craft materials.
What you'll need:
Fresh eggs (any size and shape will do, white shells showcase your creations the best)
Food colouring
Edible cake pens or gels (optional)
A little olive oil
White wine vinegar
Jam jars or containers to hold the dye
Egg Cups to show off your creations and hold your eggs when decorating
Easter Craft Time! Step 1 - Prep your eggs
If your eggs have stamps on them, you can easily remove them by gently scrubbing a little white wine vinegar over the top. When the shells are clean, you then need to boil your eggs until hard-boiled. Usually, this is around 10-12 minutes, but it will depend on the size of your eggs.

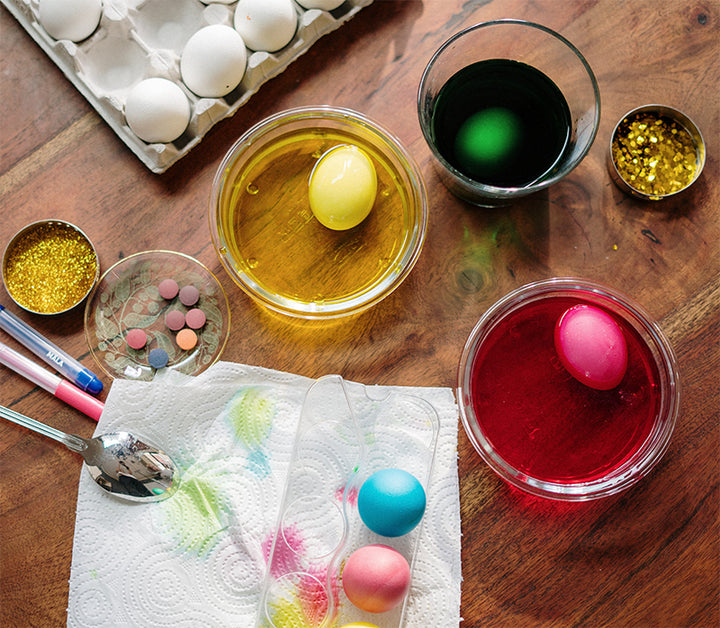
Step 2 - The dye station
While your eggs are boiling, it's time to set up the dye station. Take 10-15 drops of food colouring, a tablespoon of white wine vinegar, add both to 250ml of cold water and mix well. The more or less food colour you use, the more vibrant or pastel in shade your eggs will be. Adding in the white wine vinegar helps to bind the colour to your eggshells—make up as many different colour solutions as you want.

Step 3 - The messy bit!
Once your eggs have boiled and cooled to the touch, gently lower each egg into the dye bath and leave it submerged for around 10 minutes. When the time is up, remove the eggs with a spoon and rest them on some kitchen roll to dry. When they have dried, pop them into your egg cup, grab the glitter and cake pens and allow your little bunnies' imagination to run wild with their artistic masterpieces.
When finished, you can gently rub a little olive oil over the shell to give it a shine and store the finished eggs in the fridge until required.